How to Check Small Print and Part Numbers After Image Conversion
On this page
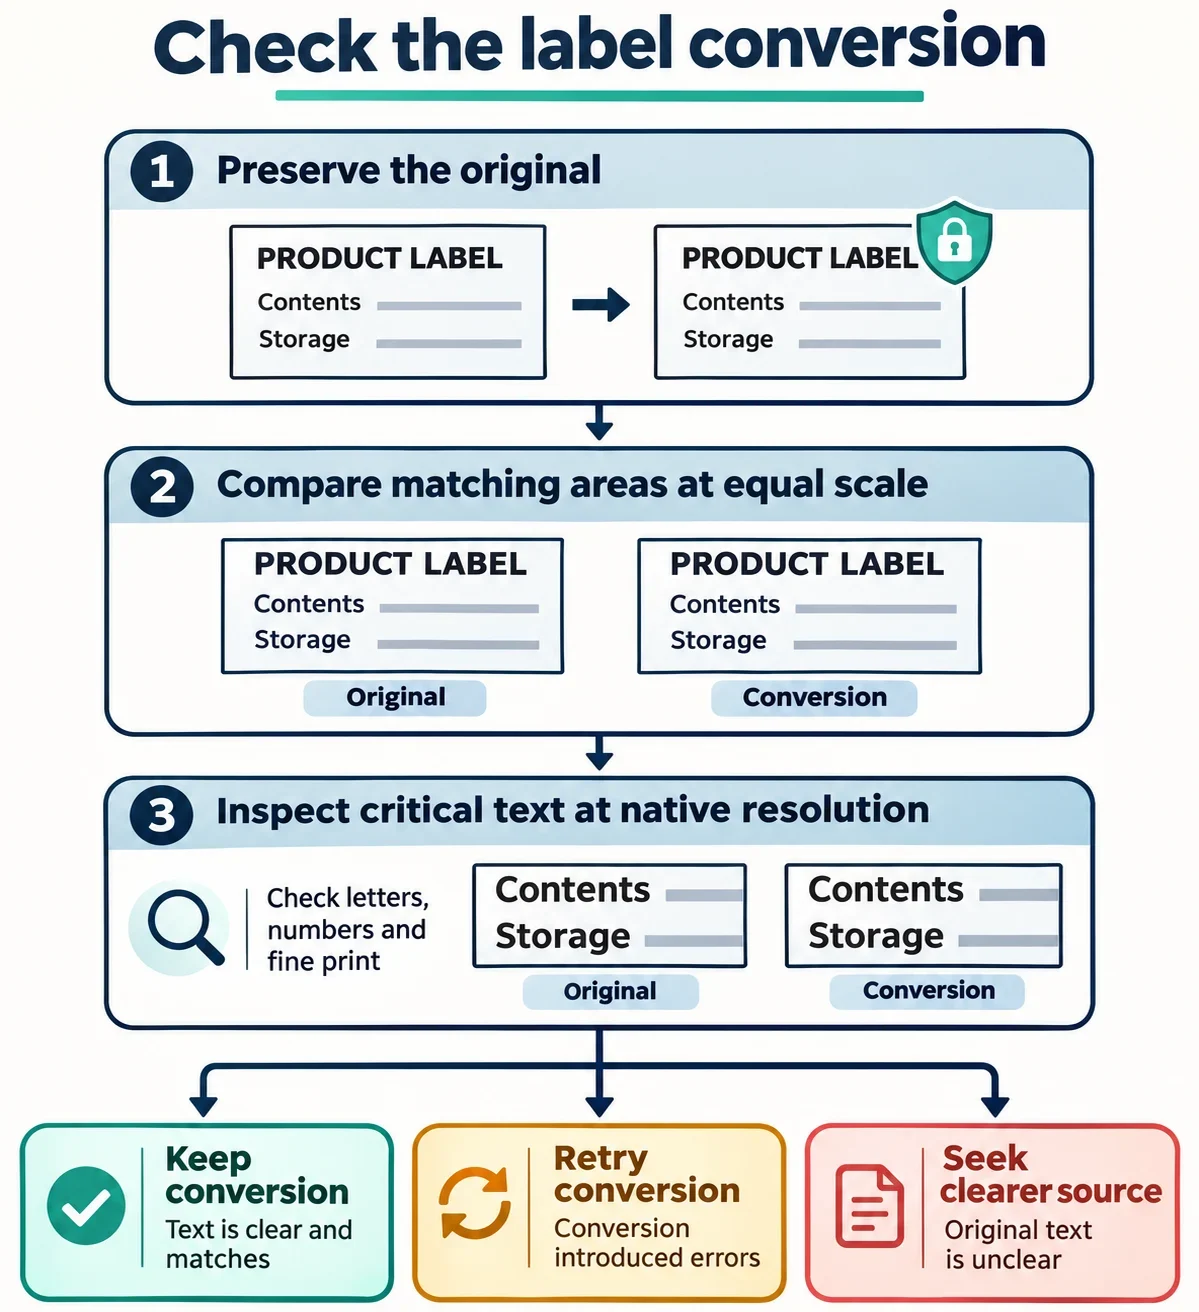
Keep a converted label image only when every character you need remains readable and agrees with the original. Start by comparing the same label area at the same displayed scale, then inspect the small print at full resolution. A readable product name does not settle whether a part number is usable.
Keep the original throughout the check. Read the identifier from beginning to end, including leading zeros, separators and suffixes, and pay attention to characters that could be confused. If the result leaves a required character uncertain, try another supported output or seek a clearer source image.
Keep the original and choose an output format
Start with the original image as your comparison source. Keep it available and save the converted result separately so you can return to the same label details. Identify which information matters for your task: the full part number, a suffix, nearby small print, or several separate lines. This gives you a concrete checklist instead of a general impression that the image looks acceptable.
Choose an output from the formats your conversion tool actually offers. If the label contains transparent areas, include the background in your review. Check the result before relying on that format for other images with similar labels.
Before converting a group, work through one image with demanding text: a long identifier, small characters, or punctuation that must remain visible. Treat this as a practice check for the comparison process, not proof that every image will pass.
Keep track of which original belongs to each result. If you create several alternatives, give them distinct working labels so you can compare them without accidentally reopening the same version. The first decision is which result to inspect; suitability comes after you have checked the text.
Compare the same label area at the same scale
Open the original and the converted file in an image viewer. If it supports side-by-side viewing, use that option; otherwise, switch between the files while keeping your attention on the same part of the label.
- Find matching boundaries, such as the edges of the label or the beginning and end of the same text line.
- Check the image dimensions shown for each file, if available, before judging an automatically fitted preview.
- Adjust the display until the matching label area occupies the same visible width and height in both views.
- Compare the entire area, then move through individual lines in a consistent order.
If the files have different dimensions, do not assume identical zoom percentages give you an equivalent comparison. Use the label itself as the visual reference for matching displayed size. Adjust a fit-to-window view before using it to judge readability.
At this stage, look for places needing closer inspection: a line that seems less distinct, punctuation that is hard to locate, or characters whose outlines appear different. Note their positions so you can revisit them at full resolution.
Keep both versions available during that closer check, and verify doubtful strokes directly against the original instead of relying on memory.
Inspect small print at full resolution
Use the viewer’s full-resolution or native-resolution view, if available, and inspect the critical text in both files. Check the viewing controls rather than assuming the current preview is suitable. You may enlarge the area further to examine a doubtful mark, but make the decision from visible characters, not a guessed reading.
Work along each required line and look for:
- A stroke that is visible in the original but missing or incomplete in the result.
- Adjacent characters or marks that are no longer distinguishable from one another.
- An outline that has become blurred enough to permit more than one reading.
Pay particular attention to O/0 and I/1 wherever either reading could matter. Compare the actual mark in both images; do not resolve it simply by choosing the character that would make a familiar-looking part number.
For a made-up identifier such as 00A-10B-R2, read the two initial zeros, each letter and digit, both hyphens, and the final suffix. Then read it again from the start without filling in any character from memory. This example is a checking exercise, not a rule for how real part numbers are structured.
If a doubtful character is clear in the original and unclear in the converted file, record it as a conversion problem. If it is unclear in both, leave it unresolved and seek a clearer source. Do not treat agreement between two uncertain readings as confirmation. Apply the same check to any small print needed for the intended task.
Check the background behind the text
If the label includes transparent areas, check how your selected output handles them before accepting the result. When considering JPEG, inspect the resulting background rather than assuming its appearance will match the original. Make this a visual check of the actual converted label.
Review every required character against the background that will appear in the image you intend to use. If your viewer offers background options for transparent images, compare those settings with care so you know what you are judging. Keep the text area at a matching displayed scale during the comparison.
Look especially at places where a faint stroke, small separator, or character edge becomes hard to distinguish. Read the whole identifier again after the background check, because a number that was clear in one view still needs to be clear in the intended result.
If any required mark becomes ambiguous, try another supported output and repeat the inspection. Ask whether the character itself is unambiguous; an attractive background is not enough to approve the label.
If transparency is irrelevant to this label, keep the review focused on the background and characters actually present in your files.
Review multiple images with a contact sheet
A contact sheet can serve as an optional overview when you have several images to review. Use it to find the corresponding labels and choose which files need attention first. Keep the originals and converted results clearly associated.
If the contact-sheet tool offers adjustable thumbnail sizes, choose a size that helps you locate the label areas. Arrange the review so you can tell which thumbnail belongs to which image. Avoid reading an identifier from a thumbnail and immediately treating it as verified.
Open an individual file whenever the small print is difficult to assess, a character looks different, or the background deserves a closer look. Return to its original, match the displayed scale, and inspect the critical text at full resolution.
Even thumbnails that look satisfactory need an individual check when their identifiers are required for your task. Use the overview to organize inspection, then base acceptance on the corresponding files.
For a larger group, keep a short review record: the image, the exact area needing attention, and whether it passed or needs another attempt. This avoids repeatedly checking one label while overlooking another.
Decide whether to keep or retry the conversion
Make the final decision against the information you actually need to read. Use the following outcomes to keep the next step clear.
| What you find | What to do |
|---|---|
| Every required character is clear and matches the original | Keep the converted result for the checked task. |
| The original is clear, but the result introduces ambiguity | Retain the original and compare another supported output. |
| A required character is unclear in both images | Obtain a clearer source before relying on the identifier. |
| Only some required lines have been checked | Complete the remaining checks before accepting the image. |
A smaller converted file does not justify an uncertain part number. Changing the image format also does not guarantee a smaller file. Compare the actual file sizes if size matters, while keeping readable, complete text as the acceptance requirement.
For a retry, select another output your tool supports and repeat the same comparison against the original. Revisit the exact character that failed, then check the rest of the required text. Correcting one doubtful mark does not finish the review of the whole label.
Finish by reading the complete identifier once more, including leading zeros, separators and suffixes. Keep the original available, and record whether the result passed, needs another conversion, or requires a clearer source image.