How to Choose an Image Convert Output Format for Product Listings
In this guide
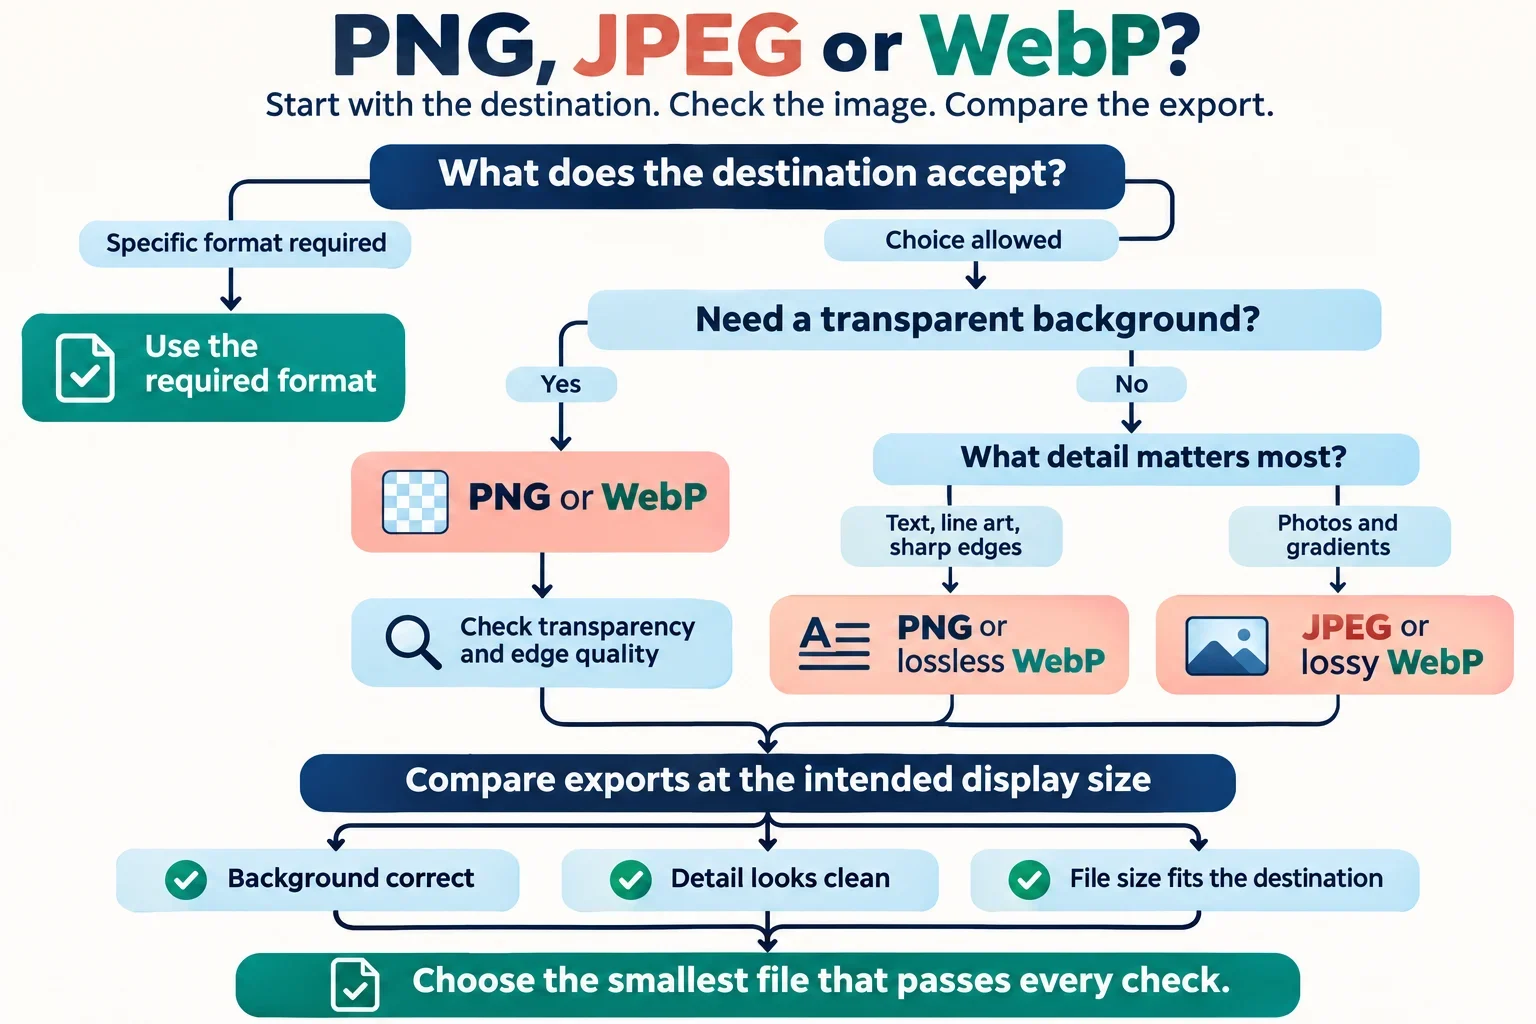
Choose your output format by checking what your listing destination accepts, then decide whether you need transparency or a white background. Compare the actual exported image with your original before choosing: changing an image’s format does not guarantee a smaller file, and the filename alone should not determine your choice.
Image Convert offers PNG, JPEG and WebP outputs. PNG is the recommended choice when you need transparency, while JPEG output uses a white background. Your final choice should also satisfy the destination’s dimensions and file-size requirements. Keep the original so you can make another export if the first result does not suit the listing.
Start with your listing destination's requirements
Before converting, open the image requirements for the exact place where you intend to upload the product photo. Record the accepted formats, required dimensions and maximum finished file size. If the destination gives separate instructions for different image positions, check the instructions for the position you are preparing.
Use those requirements to narrow the available outputs. For example, if your destination accepts JPEG and PNG, compare those choices first. Consider WebP only if the destination accepts it. An output being available in Image Convert does not establish that your destination will allow it.
Make a short checklist:
- Which of PNG, JPEG and WebP are accepted?
- What dimensions must the finished image meet?
- What is the upload file-size limit?
- Are there background requirements for this image position?
Keep the converter’s input restrictions separate from this checklist. Input restrictions determine whether your source image can be processed; destination requirements determine whether the converted file is suitable for upload. A successful conversion is therefore only one part of preparing a listing image.
If a requirement is unclear, check the destination’s current help information or ask its support team before deciding. Avoid choosing a format solely because another seller uses it: your own upload must satisfy the requirements that apply to your listing.
Choose a format for the background you need
Choose the background you want buyers to see before comparing file sizes. For a product image that needs transparent areas, start with PNG, the recommended output for transparency. If a white background is suitable, JPEG is an option to evaluate: Image Convert’s JPEG output uses a white background.
| Output | Practical starting point | What to check |
|---|---|---|
| PNG | Use when you need transparency. | Inspect the exported background and product edges. |
| JPEG | Consider when a white background suits the listing. | Check how previously transparent areas appear against white. |
| WebP | Consider if your destination accepts it. | Verify the background behavior in the downloaded file. |
For example, suppose your source shows a product surrounded by transparent space. Review a JPEG export with the white-background behavior in mind. Decide whether that appearance works for the listing, especially around fine edges and any openings in the product.
Ask yourself whether transparency is needed in this particular image position. If the destination specifies a white background, use that requirement to guide your export and check the result before upload.
If you want to try WebP for the same image, inspect the downloaded result before relying on it for a transparent-background listing. Choose it only after checking both the appearance you need and the destination’s acceptance.
Compare product detail and actual file size
Compare candidates using the same original image, so you can judge each result against a consistent reference. Export only formats that remain suitable after checking the destination and background requirements. Do not assume that one format will always look better or produce the smallest usable file.
Inspect the details that matter to the buyer
Open the original and each downloaded candidate at a comparable viewing size. Examine labels, lettering, fine edges and finish details. For a part with a printed identifier, ask whether the identifier is still easy to read. For a product with a distinctive surface appearance, check whether the exported image communicates that appearance clearly.
Also inspect the outline where the product meets its background. If the background changes, judge the product against the background you plan to use in the listing.
Compare the actual exported sizes
Record the size of each downloaded file instead of estimating it from the format name. Changing an image’s format does not guarantee a smaller file.
A simple comparison note can contain four items: output format, file size, background result and any detail that looks less clear than the original. Remove candidates that exceed the destination’s limit or obscure important information. Among the remaining choices, select the image that presents the product clearly at an acceptable size.
Select an image, convert it and save a copy
Keep your source image available before beginning. Save the conversion as a separate copy so that you can return to the original if you want to compare another output or prepare an image for a different destination.
- Select the local image you want to convert.
- Choose PNG, JPEG or WebP according to your requirements checklist.
- Start processing and allow the conversion to finish.
- Review the result, including the intended background and important product details.
- Download the converted copy and open that saved file for a final check.
Treat the downloaded copy as the file you are evaluating for upload. Check its actual format, dimensions and size using the file information available on your device. Compare those values with the destination’s requirements rather than assuming that a successful download makes the image ready.
Give the copy a descriptive name that helps you distinguish it from the original and from other exports. For example, include the product identifier and intended destination in your own naming convention, while preserving the correct format extension.
If the first result does not work, return to the original and choose another suitable output. Keep your comparison focused: change the output choice, then review the background, detail and file size again before selecting the copy to upload.
Handle an image that cannot be processed
If processing fails, check the source image before treating the result as ready for your listing. Source file size, decoded pixel count and the browser’s available memory can affect whether an image can be processed. Check any displayed error and the converter’s stated input restrictions to identify the next step.
Do not use the destination’s upload limit as a substitute for checking the converter’s input limits. They apply at different stages. Likewise, an image that is acceptable for upload still needs to pass through conversion successfully if you want a different format.
If the source cannot be processed, consider preparing a smaller source image, keeping the original intact. Before retrying, decide which product details must remain readable. After conversion, inspect those details again; a smaller source is useful only if the resulting listing image still communicates what buyers need to see.
Consider the attempt successful only when you have a converted file you can download, open and review. If no usable output is produced, return to the source or try a suitable alternative output. Keep unsuccessful attempts separate from the copy you intend to upload.
Check the finished image in your listing
Upload the selected copy and inspect the destination’s preview before finishing the listing. Confirm that the background appears as intended and that important product details remain visible. Check labels and edges again in the preview rather than relying only on how the file looked when opened on your device.
Use a final review with three questions:
- Does this uploaded image show the background I chose?
- Can a buyer read or inspect the details needed to understand the product?
- Does the finished file meet the destination’s format, dimension and file-size requirements?
If the preview disappoints, compare it with the downloaded copy and the original to decide what needs attention. Revisit the export choice when the converted copy is unsuitable; review the destination’s image instructions when you need to understand how to prepare the upload. Do not assume that repeating the same upload will resolve an unexplained difference.
If your workflow uses an image link, check that the extension in the link matches the actual file format. Resolve any mismatch by returning to a correctly identified converted copy before using the link in the listing.
Keep the original and the accepted converted copy easy to identify. That gives you a clear starting point when another listing needs a different background, format or file-size limit.